

Getting Started
OS Getting Started for Users
Written By:
Last Updated on January 20, 2026
This guide covers everything you'll do day-to-day in Warrant:
Studio — Draft content with real-time compliance feedback
Uploading — Add files and websites to your library
Scanning — Check content against compliance rules
Versions — Update content and track changes
Approvals — Submit content for review
Downloads — Export approved content
1. Studio
Studio is where you write content and get instant compliance feedback, before you've created final assets or as a last check before sending for approval.
→ Catch problems early. Don't wait until the design is locked.
Open Studio
Click Studio in the left sidebar. You’ll immediately open a new chat.
⏱️ Find past chats by navigating to “History” tab. |
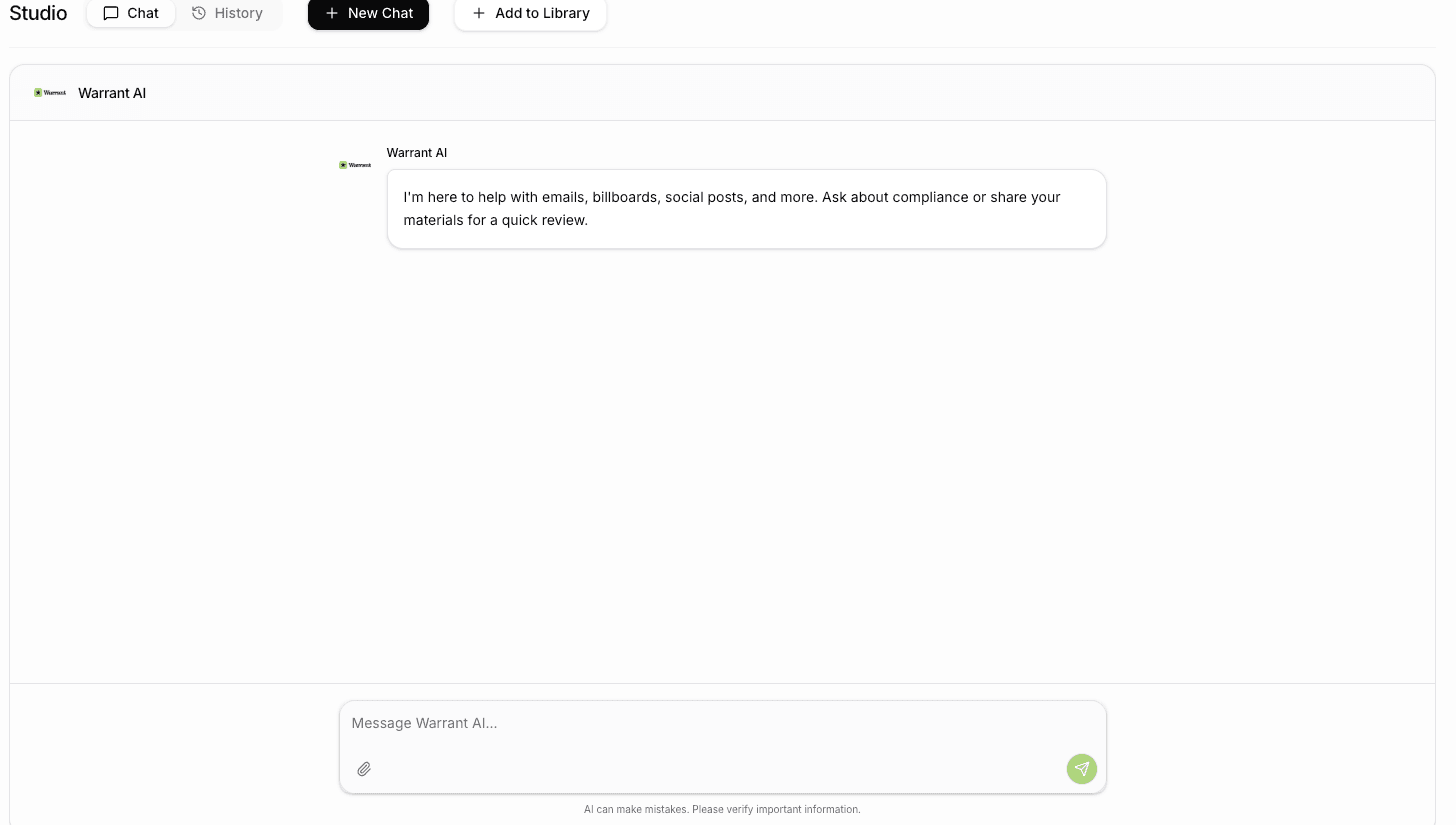
Get compliance feedback
Upload, type, or paste your content or question. You can even drag and drop a file into the chat window.
→ To get a better review, add context on the channel, product, and geography to your request.
Warrant analyzes your content and shows:
What's flagged — the specific text with issues
Why — which rule it violates
How to fix it — suggested alternative language
Make changes, upload new versions, and ask for clarification.
When your draft is ready for formal review or to add to the company’s file libary, click “Add to Library.”
Then, either “Add to Folder” or “Create a New Project.”
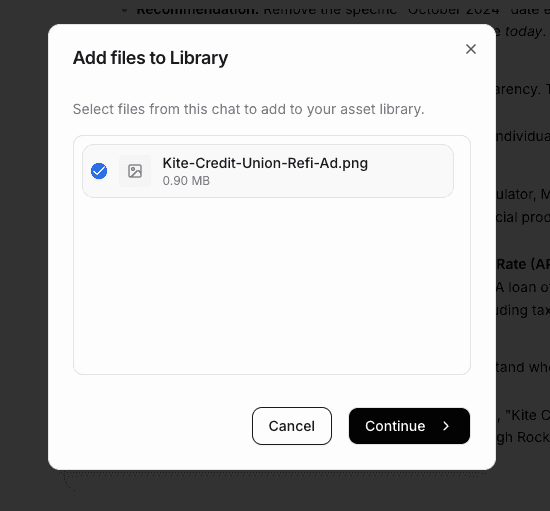
Your content is now in the File Library where you can scan it, add new versions, and submit for approval.
2. Uploading Content
Add existing files or capture web pages to review in Warrant.
→ Everything in one place, a single source of truth for your marketing assets. PDFs, images, videos, and even live web pages.
File Types
Warrant is a full digital asset manager that is flexible to how your team works.
Method | Use for |
File | Each upload creates a new file, which can have multiple versions. |
Version | Upload new versions from the sidebar in file viewer to track changes over time and document approvals. Approvals happen at the version level. |
Projects | Group related files together—ideal for marketing campaigns or product launches. |
Folder | Organize files using folders and sub-folders. Drag and drop or use “Move” to move files and projects between folders. |
Star | Quickly access important files, projects, and folders from your sidebar. |
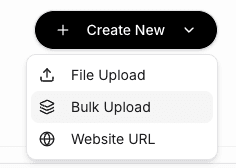
Three ways to upload
Method | Use for |
File Upload | Single files from your computer |
Bulk Upload | Many files at once (2+) |
Website URL | Capture a public web page |
Upload a file
Select “Create New” button from the top bar. Select “File Upload.”
Select file to upload or drag and drop.
Supported: PDF, DOCX, PPTX, PNG, JPG, GIF, MP4, MOV
Decide to either “Create New Project” or “Upload to Library.” You can also open a Studio chat by clicking “Review in Studio.”
Select folder or all assets & files.
Click upload file.
View file.
⏱️ Best practice is to go to the file and update name, description, channel, audience, and geography. You can also add tags. |
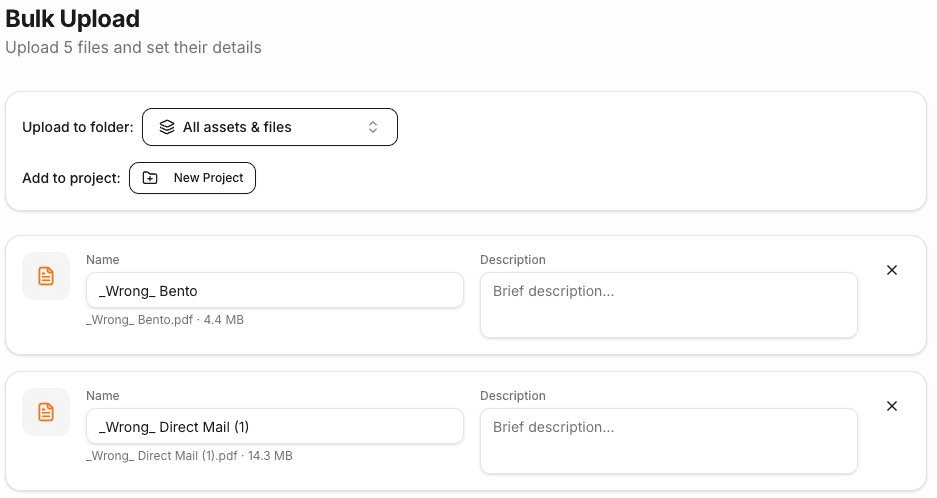
Bulk upload
→ This is great for migrating existing content.
Click “Create New” button from the top bar. Select “Bulk Upload.”
Select multiple files (Ctrl+click or drag to select)
Decide to upload to a folder or add to a project.
Add name and brief description to each file.
Then click “Upload.”
Capture a website
Click “Create New” button from the top bar. Select “Website URL.”
Paste the full URL of the page you would like to add. Click “Capture Website.”
Warrant captures the page as a png and pdf. Now you can scan it like any other file.
⚠️ Only works for public pages. Pages behind logins (i.e., Figma, Google Docs) won't import. |
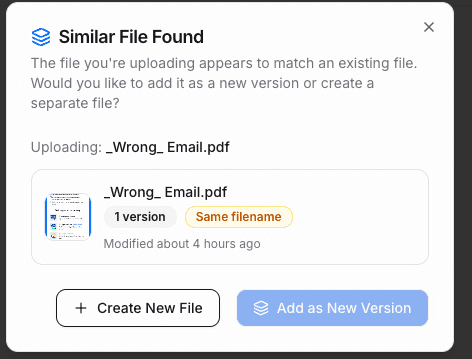
Duplicate file check
→ Warrant automatically compares new uploads to past materials, so your library stays clean and you can track items across versions.
If your file has the same name or is 80% similar to an existing file, Warrant will flag you during upload.
You have two choices:
You can add the file as a new version. It will be part of the existing file as the new primary version.
OR Create a new file. These files will not be linked.
3. Running Scans
Check your content against compliance rules before submitting for approval.
→ Know exactly what needs to be fixed and save your approver’s time.
Open your file
Double-click any file in your library to open it in the File Viewer.
Start a scan
Click Scan in the toolbar
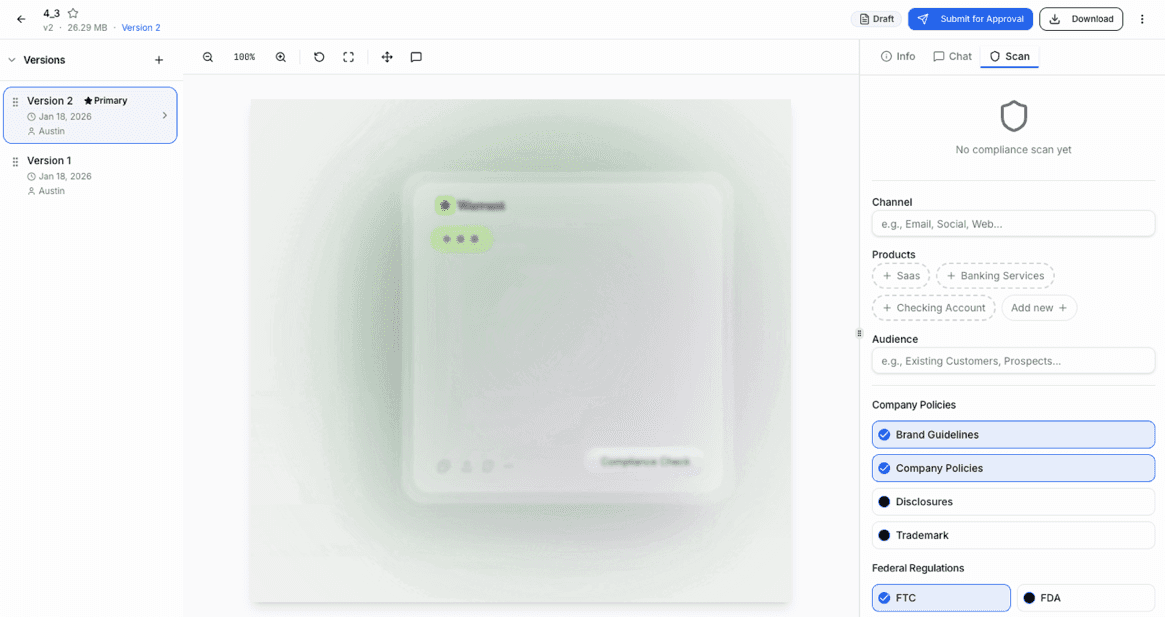
Fill in the scan details:
Field | What to enter |
Channel (Optional) | Where will this be used? (Social, email, print, web) |
Products (Optional) | Which product is this about? |
Audience (Optional) | Who's the target audience? Primarily an issue for ads targeting children, restricted demographics (seniors, veterans, etc.), and certain professions (healthcare workers, teachers). |
Company Policies | Which internal rules to check? Brand guidelines, company policies, disclosures, trademarks. |
Federal Regulators | Which federal regulators to check? |
State Regulations | If you are running advertising that targets a specific state, such as out-of-home placements, direct mail, or events within that state. |
3. Click Run Compliance Scan
Review results
Results show up organized by risk:
Flag | What it means |
🔴 High Risk | Fix this before publishing — could mean fines or regulatory action |
🟡 Medium Risk | Should review — could attract scrutiny |
🟢 Low Risk | Minor issue — nice to fix but not critical |
Click any flag to see:
The exact text that's problematic and where it is in the asset
Which AI policy rule it violates
→ Fix the issues, upload a new version, and scan again to confirm they're resolved.
4. Adding Versions
When you update content, add a new version instead of uploading a new file.
→ All your history stays connected. See what changed, when, and why.
When to add a version
You fixed compliance issues
You got feedback and made edits
Content was updated for a new campaign
An approver requested changes
💡 Always add versions to existing files instead of uploading new files. It keeps your history intact. |
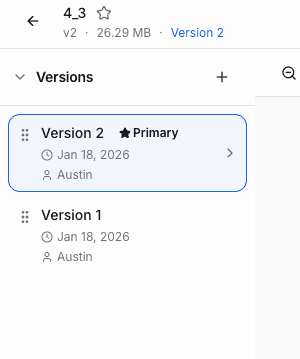
How to add a version
Open the existing file in File Viewer (double click file).
Click “+” from Versions on the lefthand sidebar.
Select “Upload New Version” or “Link Existing File.”
The new version becomes the Primary and the previous versions are saved. You can drag and drop to reorder the versions in the sidebar.
5. Getting Approvals
Submit content for review when it's ready to be used.
→ Clear audit trail. No more 'did legal sign off on this?' questions.
Before you submit
✓ Content is uploaded
✓ Scan is complete
✓ You've addressed the flags (or know why you're accepting them)
Chat
You can either choose to submit something formally for review or chat with existing users. Chats happen in the “Chats” tab and are linked at the version level.
Add a comment by clicking the Comment button above File view.
Select where on the item you would like to add a comment. For videos, it will be added to a specific timestamp.
Mention another user with “@” and they will get a notification.
Resolve or reply to comments from the “Chats” tab.

Submit for approval
Open your file (double click). Ensure you have filled out all file details in Info tab, including description, channels, products, geography, and due date.
Click “Submit for Approval” in the Info tab or on from the top menu bar.
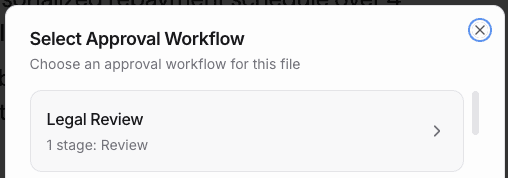
Choose an Approval workflow
Add notes for reviewers (Optional)
What changed since last version
Anything specific to review
Deadline if there is one
Click Submit. Reviewers in the first stage will get notified immediately.
Track your submission
Activity Log on the file shows real-time updates.
You'll get notified when there's a decision via the Notifications page.
If changes are requested
You'll get a notification on the Notifications page with the feedback.
Make the changes and upload a new version.
Select “Changes Made” on the Info Tab to resubmit for approval.
6. Downloading Content
Export content when you need it.
Download one file
Open the file (double click)
Click Download button in top right-hand corner.
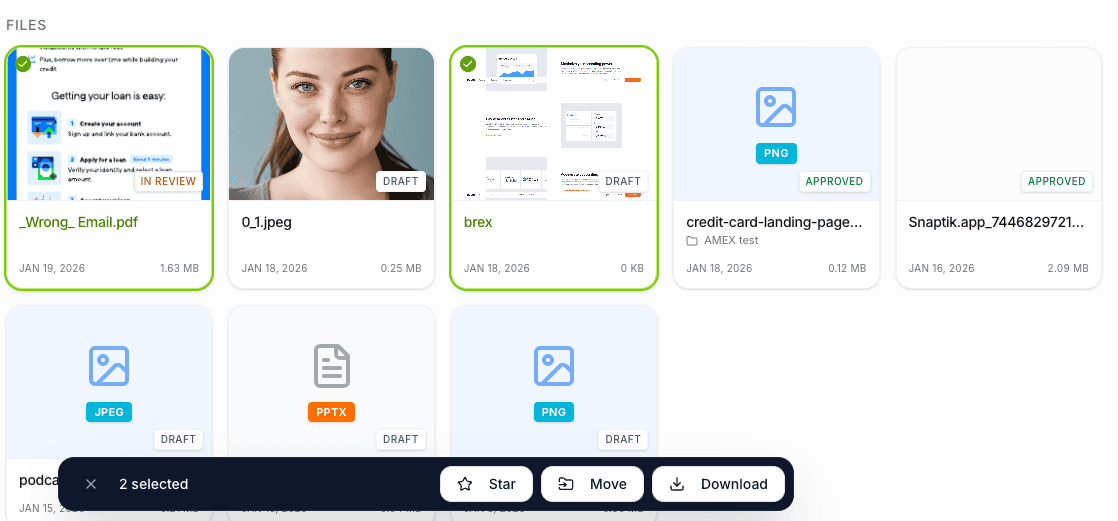
Download multiple files
Navigate to and select multiple files by holding down SHIFT key.
Click “Download” from the bottom hover bar.
Warrant creates a ZIP with all selected files.
Find your files quickly
My Uploads in the sidebar shows files you uploaded
Search finds files by name and content
Star folders to add them to Favorites on sidebar
Quick Reference
I want to... | Here's how |
Draft content | Studio |
Upload a file | Create New → File Upload |
Upload many files | Create New → Bulk Upload |
Capture a web page | Create New → Website URL |
Run a compliance scan | Open file (double click) → Scan → Configure → Run |
Add a new version | Open file → Add Version “+” → Select file |
Add a comment | Open file → Chat → Add comment on file |
Submit for approval | Open file → Submit for Approval |
Approve content | Approvals → Pending Or Notifications |
Download content | Open file → Download |
Find my uploads | Sidebar → My Uploads |
Find content | Search → Filter by… |
File viewer
Warrant allows you to view all documents, videos, and images in an easy file viewer.
Method | Use for | |
Versions Left Hand Sidebar | Upload new versions to track changes over time and document approvals. Approvals are granted at the version level. | |
Info Tab Right Hand Sidebar | Add file details, view smart metadata, see activity log and transcript. | |
Chat Tab Right Hand Sidebar | Add comments, mention users, and resolve threads. | |
Scan Tab Right Hand Sidebar | Run compliance scans. | |
Zoom in/out. | ||
Reset to full view, view full file. | ||
Pan. Move the file around the viewer. | ||
Navigate. Flip through pages. | ||
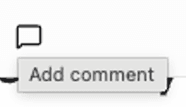 | Comment. Add comments directly on the file. |
Your typical workflow
Draft in Studio (or upload existing content)
Run a compliance scan
Fix issues → Add version → Scan again
Submit for approval
Handle any change requests or comments
Download and publish
Need help?
In-app chat — Click the chat icon for instant support (Coming Soon)
Email — support@hellowarrant.com
Slack — Join our Slack channel.
Related to Getting Started
